Read more: http://www.food.com/recipe/easy-naan-bread-machine-41503#ixzz1QPtPA4l6
Sunday, June 26, 2011
Bread Machine Naan
Read more: http://www.food.com/recipe/easy-naan-bread-machine-41503#ixzz1QPtPA4l6
Quick Curried Chick Peas
This was really good too- but the chick peas took a long time to cook. I covered the pot at the end and that helped some. I also made some homemade naan with this which I will post next. Great Indian flavors yum yum! again budgetbytes.blogspot.com. Click here for the pictures. Enjoy!
Servings Per Recipe: 6
Cost per serving: $0.53
Prep time: 10 min. Cook time: 20 min. Total: 30 min.
| INGREDIENTS | COST | |
| 2 Tbsp | olive oil | $0.22 |
| 1 med | yellow onion | $0.37 |
| 2 cloves | garlic | $0.14 |
| 2 (15 oz.) cans | chick peas, drained | $1.32 |
| 1 (20 oz.) can | tomato sauce | $0.52 |
| 1 cup | water | $0.00 |
| 1 Tbsp | curry powder | $0.15 |
| 1/2 bunch | fresh cilantro | $0.44 |
| TOTAL | $3.16 | |
STEP 1: Dice the onion and mince the garlic. Cook the onion and garlic in a large pot with olive oil over medium heat until softened (3-5 minutes).
STEP 2: Drain the canned chick peas and add to the pot. Also add the tomato sauce, water and curry powder. Stir the pot until everything is evenly mixed. Bring the mixture up to a simmer over medium heat.
STEP 3: While the chick peas are simmering, rinse the cilantro and pull the leaves from the stems. Roughly chop the leaves and add them to the pot. Give everything a stir and continue to simmer until the sauce has reduced to a thick consistency (about 20 minutes total). Stir the pot every few minutes to prevent the sauce from burning and sticking to the bottom.
Saturday, June 25, 2011
Rice Pudding (Aka Kheer)
Ok, once again http://budgetbytes.blogspot.com. The only thing I changed was adding more cinnamon at the end. I also served it cold because that is how I like my rice pudding. And I did use yellow raisins instead of regular. This was a big hit. Click here for the picture play by play. Hope you enjoy!
Total Recipe cost: $2.74
Servings Per Recipe: 4
Cost per serving: $0.69
Prep time: 5 min. Cook time: 45 min. Total: 50 min.
STEP 1: Saute the almonds and raisins in butter over medium heat for one minute. Add the dry rice and saute for 1-2 minutes more or until it looks slightly golden and toasted. Watch the heat carefully, if the butter or sugar from the raisins begins to burn take it off of the heat immediately.
STEP 2: Add the milk, sugar, cinnamon, nutmeg, vanilla and bay leaf to the pot. Using a whisk stir it well so there are no clumps. Bring the mixture to a boil over medium/high heat while stirring often with a whisk. As soon as it comes to a boil, reduce the heat to medium/low and let it continue to simmer until thickened (30-40 min). Stir often with a whisk to prevent caking and burning on the bottom.
STEP 3: After 30-40 minutes the rice should be soft and the mixture should be thick and creamy. Serve hot or cold.
Servings Per Recipe: 4
Cost per serving: $0.69
Prep time: 5 min. Cook time: 45 min. Total: 50 min.
| INGREDIENTS | COST | |
| 1 Tbsp | butter | $0.05 |
| 1/4 cup | sliced almonds | $0.16 |
| 1/4 cup | raisins | $0.56 |
| 1/2 cup | jasmine rice | $0.44 |
| 4 cups | milk | $1.30 |
| 1/2 tsp | cinnamon | $0.05 |
| 1/4 tsp | nutmeg | $0.05 |
| 1/4 tsp | vanilla extract | $0.07 |
| 1 whole | bay leaf | $0.02 |
| 1/4 cup | sugar | $0.04 |
| TOTAL | $2.74 | |
STEP 1: Saute the almonds and raisins in butter over medium heat for one minute. Add the dry rice and saute for 1-2 minutes more or until it looks slightly golden and toasted. Watch the heat carefully, if the butter or sugar from the raisins begins to burn take it off of the heat immediately.
STEP 2: Add the milk, sugar, cinnamon, nutmeg, vanilla and bay leaf to the pot. Using a whisk stir it well so there are no clumps. Bring the mixture to a boil over medium/high heat while stirring often with a whisk. As soon as it comes to a boil, reduce the heat to medium/low and let it continue to simmer until thickened (30-40 min). Stir often with a whisk to prevent caking and burning on the bottom.
STEP 3: After 30-40 minutes the rice should be soft and the mixture should be thick and creamy. Serve hot or cold.
Monday, June 20, 2011
Sweet Potato Enchiladas
http://budgetbytes.blogspot.com/ strikes again! Check these out- amazing! Especially for all my vegetarian friends out there- so so good! I need to find a new website but these are so good! Click here for the pictures. The only change we made was adding cayenne pepper for some kick! But man were they yummy!
Enjoy!
Sweet Potato Enchiladas
Total Recipe cost: $3.83Servings Per Recipe: 4 enchiladas
Cost per serving: $0.96 per enchilada
Prep time: 10 min. Cook time: 30 min. Total: 40 min.
| INGREDIENTS | COST | |
| 2 cups | Roasted Poblano and Sweet Potato Salad | $1.52 |
| 4 | fajita size flour tortillas | $0.32 |
| one 10 oz. can | enchilada sauce | $1.00 |
| 1 cup | shredded cheddar | $0.99 |
| TOTAL | $3.83 | |
STEP 1: Preheat your oven to 350 degrees. Spray a baking dish lightly with non-stick spray. Using a fork, slightly mash the Roasted Poblano and Sweet Potato Salad.
STEP 2: Lay out your tortillas and divide the mashed up sweet potato mixture evenly between all four (about 1/2 cup each). Sprinkle a little bit (about 2 Tbsp) of shredded cheddar in each tortilla as well. Gently fold the sides of the tortillas in toward the center, one side over the other, until they look like fat cigars.
STEP 3: Pour a little bit of enchilada sauce in the bottom of your baking dish. Place the rolled enchiladas in the baking dish, seam side down. Top the enchiladas with the rest of the sauce and the rest of the shredded cheese.
STEP 4: Bake the enchiladas at 350 degrees for about 30 minutes. Enjoy!
Saturday, June 18, 2011
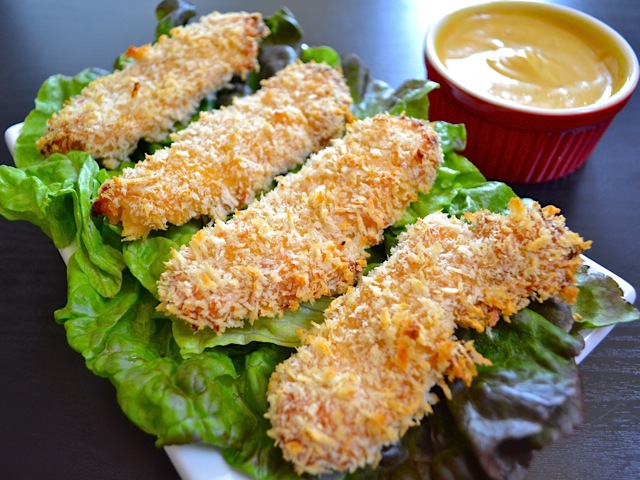
honey mustard chicken strips
honey mustard chicken strips
Again from:http://budgetbytes.blogspot.com
Click here to get the play by play with pictures.
This one was really good. Hope you enjoy it! We served it with a tortilla, lettuce, and tomato. It was yummy.
Total Recipe cost: $6.02
Servings Per Recipe: 4 (3-4 strips each)
Cost per serving: $1.51
Prep time: 30 min. Marinate time: 30 min. Cook time: 30 min. Total: 1 hr. 30 min.
| INGREDIENTS | COST | |
| 2 lg. | chicken breasts | $2.48 |
| 1 cup | mayonnaise | $1.69 |
| 1/3 cup | honey | $0.79 |
| 1/4 cup | mustard (any variety) | $0.27 |
| 1/4 tsp | garlic powder | $0.02 |
| 1/4 tsp | paprika | $0.02 |
| to taste | salt and pepper | $0.05 |
| 2 cups | panko bread crumbs | $0.70 |
| TOTAL | $6.02 | |
STEP 1: In a bowl, combine the mayonnaise, mustard, honey, garlic powder, paprika, and some freshly ground black pepper. Stir until everything is evenly combined then taste and season with salt to your liking. Divide the sauce into two portions. Half will be the marinade and half will be the dipping sauce - it MUST stay separate. Keep the sauce refrigerated until ready to use.
STEP 2: Trim the chicken breasts of excess fat and slice diagonally into 1/2 inch thick strips. You should get about 14-16 strips total. Place the sliced chicken in a bag or bowl with half of the honey mustard sauce and stir to coat. Refrigerate for at least 30 minutes or over night.
STEP 3: Preheat the oven to 400 degrees. Prepare a dredging station by lining a large baking sheet with foil and then placing two wire cooling racks on top. The wire racks keep the strips lifted as they bake so that the bottoms will crisp too. Coat the wire racks with non-stick spray. Pour the panko crumbs into a wide, shallow bowl.
STEP 4: One by one, coat the chicken strips with panko crumbs. Do not wipe off excess honey mustard sauce before coating with panko, the sauce helps it adhere. Place the strips on the wire rack as you bread them. Continue until all of the strips are coated with panko crumbs. Discard the leftover honey mustard sauce that the chicken was marinating in.
STEP 5: Bake the chicken strips in the oven until the crumbs have turned golden brown (about 30 minutes).
To Fry: Alternatively, heat about 1/2 inch of vegetable oil in a large skillet over medium-high heat until the surface of the oil looks wavy. Fry a few strips at a time on each side until they are golden brown and crispy. Drain on a plate covered with paper towels.
STEP 6: Serve warm with the reserved half of the honey mustard sauce.
Friday, June 17, 2011
White Pizza

So Adam and I decided to make pizza today. So I got out my handy bread maker to make the dough then added lots of goodness. I used half for the first pizza and the other half for the second.
Dough:
3/4 cup water (80 degrees Fahrenheit)
1 Tbsp Oil
1 Tbsp sugar
1/2 tsp salt
1 Tbsp dry milk
2 1/4 cups bread flour
1 tsp Active Dry Yeast
Sauce
1 tsp garlic minced
1 tbsp butter
heat up for 15-20 seconds to melt butter
1/4 cup or so of Olive Oil
salt and pepper
I did this to taste so use at your own risk :). I also brushed it on the crust instead of pouring it.
Toppings:
We did:
roasted red pepper
white onion
chicken (precooked with salt, pepper, basil, olive oil)
feta cheese
fresh mozzarella
bake at 425 degrees farenheit for 20 minutes or so- until edges are brown.
(The picture shows some already eaten because I forgot to take one before :) ).
We did a second one but that was basic- red and green pepper, pepperoni, onion, fresh and shredded mozzarella, and canned pasta sauce.

Happy cooking!
Tuesday, June 14, 2011
broccoli shells n' cheese
This was really yummy. I did add a lot of hot sauce and some more parmesan to make sure it had flavor. I kept tasting until I liked it. But check this one out! Yum! And Asher loved it! :)
I took this one directly so click here to get the play by play with pictures.
broccoli shells n' cheese$6.05 recipe / $1.01 serving
I got a request from Nelson (a BB reader) last week to make some homemade mac n' cheese and what a fantastic idea it was. I really need some mac n' cheese in my life right about now.Of course, there is the issue of guilt surrounding eating large quantities of cheese so I added some good ol' broccoli to rationalize it all. ha. right. If you don't want broccoli, just leave it out, make everything else as directed and you'll have a good classic mac n' cheese.
Making a cheese sauce can be a little bit intimidating at first but give it a shot. Once you get the hang of it, it's super easy. The thickening action of the roux is kinda like magic, very mysterious but you gotta learn to trust it. It will thicken.
I like to use medium to sharp cheddar for my mac and cheese because I feel like cheese sauce needs that extra punch of flavor. I also ended up adding a little parmesan (another strong cheese) because after tasting the sauce I wanted it evencheesier! I despise a bland macaroni and cheese.
Then there is the hot sauce. I add just a little to add flavor but not really any heat. The hot sauce is completely optional. Many people add dry mustard which has a similar effect on the flavor. It just gives it a little zing. In the end, the cheese sauce is all about tasting and adjusting. And really, who's complaining about repeatedly tasting cheese sauce? No one.

Total Recipe cost: $6.05
Servings Per Recipe: 6
Cost per serving: $1.01
Prep time: 10 min. Cook time: 30 min. Total: 40 min.
| INGREDIENTS | COST | |
| 8 oz. | pasta | $0.55 |
| 1 lg. crown | broccoli | $1.69 |
| 1/2 med | onion | $0.18 |
| 3 Tbsp | butter | $0.12 |
| 3 Tbsp | all-purpose flour | $0.03 |
| 2.5 cups | milk | $0.65 |
| 8 oz. (2 cups) | sharp cheddar, shredded | $2.49 |
| 1/4 cup | grated parmesan | $0.24 |
| 1 tsp | hot sauce (optional) | $0.05 |
| to taste | salt and pepper | $0.05 |
| TOTAL | $6.05 | |
STEP 1: Get a large pot of salted water on to boil. Rinse the broccoli well and cut it into small florets.
STEP 2: The pasta and broccoli will be cooked in the same pot to save on dishes and time. When the water comes to a full boil, add the pasta. Set a timer for 8 minutes then add the broccoli. Cook the pasta and broccoli for two minutes more and then pour everything into a colander to drain. Set them aside until ready to add to the cheese sauce.
STEP 3: While the pasta and broccoli are doing their thing, you can begin the cheese sauce. Finely dice the onion and cook with butter over medium heat until softened (about 2-3 minutes).
STEP 4: Add the flour to the butter and onion. The flour and butter will form a paste like mixture (roux). Using a whisk, stir and cook the roux for 1-2 minutes more taking care not to let it scorch. This slightly cooks the flour preventing the cheese sauce from having an overly flour or paste like flavor.
STEP 5: Add the milk and whisk well to dissolve all of the flour clumps. Add freshly cracked black pepper at this point. Bring the mixture up to a simmer (you may need to raise the heat just slightly). When the sauce reaches a simmer, it will begin to thicken. When it is thick enough to coat the back of a spoon, it's time to add the cheese.
STEP 6: Turn the burner off and whisk in the shredded cheese (and parmesan if using) until it is fully melted in. Give the cheese sauce a taste and add salt, pepper and hot sauce to taste.
STEP 7: Once you have the cheese sauce seasoned to your liking, stir in the cooked and drained pasta and broccoli. Serve hot and gooey!
Have fun all :)
Subscribe to:
Posts (Atom)